Bunny Boxes

Aren’t these the cutest boxes ever!  I don’t know which I like the best – the pink or the blue.  I’m always partial to pink, but I just LOVE the blue baseball hat!

Blue bunnyThe box is actually made with 4 die cut Scallop Envelopes.  The head, face, ears and feet are all punched.  Debbi did Bunny Blue in Bashful Blue and white.  She cut strips of DSP to cover the front and sides.  We debated about the hat and finally turned to Clip Art.  Deb found a hat she liked, sized it, and printed it on cs.  It is actually a white hat that she colored blue.  This box is perfect for hiding candy or little gifts.  We will be hiding a few jelly beans in ours.  Now, let’s look at Bunny Pink.


Pink bunny

Bunny Pink was our prototype and we learned from her.  First and foremost – you CANNOT bend all 4 Scallop Envelope flaps.  We did on this one causing the head to flop.  We ended up lowering the head in order to provide stability.  If you compare Bunny Pink with her sibling above, you will note that his head is much higher than hers.  We also learned that it is best to score the strips running around the base of the box.  This provides a crisp look.  Deb used the wooden bow maker to fashion the little pink bow.  Isn’t she just toooooooooo cute????

We will have paper out to make a blue, pink, or green bunny box.  In addition, there are several DSP patterns to choose from.  Remember – this is all about choices!  Pink bunny with a pink baseball hat?  Green bunny with a pink bow?  What will you choose? 

We have plenty of Welcome Spring Stamp Camp space for stampers on both Friday and Saturday.  At this time, I am only aware of 5 people attending.  Friday, April 1st, 3 PM – 9 PM and Saturday, April 2nd, 9 AM – 4 PM.  4 projects for just $11.00.  We will be wet embossing, dry embossing, using the Big Shot, learning the faux pressed flower technique, and walking away with the know-how and instructions to reproduce all the projects.  Give me a call if you have any questions – 630-759-3089.  Hope to see you soon. 

Plan now for our May Stamp Camp is Blossoms, Butterflies and Birds” – A stamp camp dedicated to nature.  Friday May 6th, 3 PM – 9 PM and Saturday May 7th, 9 AM to 4 PM


Don’t miss out on your FREE PRODUCT for every $50.00 order placed by March 31st.  Give me a call today – 630-759-3089.


Bigz L Die and a 3-Dimensional Flower

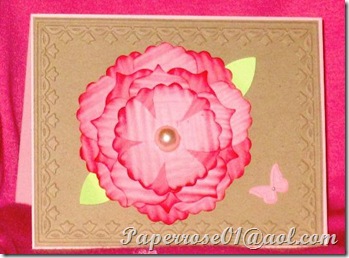
The new Bigz L die has tons of possibilities.  We decided to use it for the April Welcome Spring Stamp Camp on a card.  However fabric flowers could also be fashioned with this die.  The flowers we made are large and use all 3 petal sizes.  However, you could actually use just 1 or 2 petal sizes for a smaller blossom.  You can choose the card stock of your choice.  We did 2 samples with Pretty in Pink and sponged the edges, the 3 samples with a combination of pink cs and DSP. 

Pink FlowerWe used Pretty in Pink cs – 2 layers of each petal – and highlighted the center with a half pearl.  Note the new Framed Tulips Textured Impressions Embossing Folder.  Debbi also chose to sponge the petals in Rose Red and then crimp them adding more dimension.

Pink and Red FlowerI used 2 pieces of retired DSP for the 2 smaller petals, and Pretty in Pink for the larger petal.  Note the sparkly red rhinestone center, and the small pearl-studded butterfly. Although the flower looks flat, I curled the petals for more dimension. 


Vintage Flower 1 This flower has more of a vintage look.  I used some of the new Springtime Vintage DSP and added an antique brad for the flower center.  Blushing Bride is color of the card with an embossed Crumb Cake front.


Pink Flower Pearls

This full pink flower is sponged in Regal Rose and again features the half pearl center.  The Crumb Cake is embossed with the Elegant Bouquet Embossing Folder and the little blossoms are studded with pearls.


Bold and Sparkly Flower

I will admit I was a bit carried away with this Bold and Sparkly dimensional flower.  I popped the blossoms from the embossing folder with a touch of Red Riding Hood.  My flower petals are a combination of retired and current DSP.  I crimped the Pretty in Pink and the top petals to add interest.  Then I decided to add some bling!  However, the rhinestones on the leaves was just tooooooooo much! 

These samples should give you examples of what you might choose to do.  Perhaps you have some DSP scraps you would like to use.  What embossing folder will you use – the new Framed Tulips, or the trustworthy Elegant Bouquet?  Your flower can be soft and pretty – vintage – bold – or whatever you choose to make it!

Remember that the Welcome Spring Stamp Camp starts at 3 PM on Friday, April 1st ( no joke!) and 9 AM on Saturday, April 2nd.  We are doing 3 cards and a box.  The cost is $11.00.  Give me a call at 630-759-3089 if you have any questions.  We will have tuna fish sandwiches to snack on Friday night, and coffee cake with fresh brewed coffee for Saturday morning. 

Just so you know, Diane will be coming on Friday.  I’m sure you all saw her picture in My Suburban Life this month.  I think if we ask her nicely, she will sign autographs.

Check in tomorrow for the cutest Easter Bunny basket EVER!

Easter Blossoms X 3

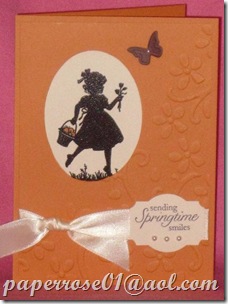
The Easter Blossoms Stamp Set was one of those sets that was love at first sight for me!  My favorite is, of course, the silhouette girl with the Easter egg basket.  As you remember, we filled the basket with hearts and used this image for Valentine’s Day.  Well, at our Welcome Spring stamp camp, you will have the opportunity to wet emboss either the girl silhouette, the spring branch, or the Easter egg in an assortment of colors:

Easter Blossoms with peach   Easter Blossoms branch envelope

Here we have Easter Blossoms in white with Peach Parfait and pearl highlights.  We used the Elegant Bouquet Embossing Folder.  I love the coordinating envelope!

Easter Blossoms peachEaster Blossoms Lilac


Here we have used Lovely Lilac (retired) with Elegant Eggplant highlights.  The Peach Parfait card features the “sending Springtime smiles” message – so perfect for this time of year.

Easter Blossoms Easter EggEaster Blossoms white


I embossed the Easter eggs in mint green, lavender, light blue, and pink.  I also was a bit carried away, spattered the card with Grape Crush and added rhinestone accents. 

Easter Blossons branch

Lastly, we have the Easter Blossom branch embossed in mint green and highlighted with lilac flowers.  I had a bit of an adhesive error, and compensated for it by sponging the card in Elegant Eggplant.  Now the big question – which image will you emboss in what color, and what color card stock will you use?????

It All Started With A Get Well Card!

I’m happy to report I am 99% over the upper respiratory infection I had during March Stamp Camp.  A bit of cough remains, but Nyquil insures I will sleep at night.  Shortly after Stamp Camp earlier this month – when I decided that indeed, I was going to live – I decided to make myself a get well card.  Actually, I wanted to fool around with a technique I had seen – the faux pressed flower.

Get Well CardNow remember, I still didn’t feel up to par, and I was just fooling around so I apologize for the lack of design on the card.  However, if you look closely, you can see that the entire card is embossed with the Square Lattice Impressions Embossing Folder.  I attached paper flowers with adhesive, punched 1/4” paper centers for the flowers, and ran the card front through the Big Shot with the embossing folder.  The paper flowers are embedded into the paper and indeed look like a dried , pressed flowers. 

Faux Pressed Flowers Yellow

So, I suggested to Debbi that she develop a card using the faux pressed flower technique for our Welcome Spring Stamp Camp this weekend.  She cased a card using the Baroque Motif stamp set, updated the colors and look, and came up with this card.  Of course, we did not have ANY yellow flowers.  So Debbi took some inexpensive white paper flowers we had purchased from Oriental Trading Post, and she dyed them yellow with yellow re-inker and  water in a spray bottle.  Debbie sponged the white card stock in basic black after she had stamped the image.  Then she  adhered the white cs to black cs.  She adhered this to Daffodil Delight cs, added the yellow paper flowers, used a touch of glue to add 1/4” Basic Black centers, and ran the finished product through the Big Shot using the Square Lattice Impressions Embossing Folder.  Now I will admit, it takes a bit of muscle to roll 4 layers of cs through the Big Shot.  We also found you need to go back and forth several times to obtain even embossing, but the end result is just too cool.  To finish the card, Debbi attached the card front to a black card, added a small bow of 1/4” Daffodil Delight satin ribbon, and adhered a yellow top note inside the finished card. 

Faux Pressed Flowers Turquoise

I had a belated anniversary card to make, so I decided I would try Tempting Turquoise with some turquoise paper flowers I had purchased from Michaels.  The bottom flower is 2 larger 4-petal flowers.  When placed one on top of the other, and run through the Square Lattice Embossing Folder, the flower ends up round in shape.  I like the faux pressed flower look and have decided this is an easy technique I will use from time-to-time.

So, plan on coming to the Welcome Spring Stamp Camp on April 1st and 2nd (No, this is NOT an April Fools Joke).  Friday we will meet from 3 pm – 9 pm and on Saturday, we will stamp from 9 am to 4 pm.   However, I anticipate everyone will be finished in 2 hours.  We will be making 4 projects – one of which is the CUTEST BUNNY BASKET you have ever seen!  We will even add Easter grass and some jelly beans. 

Check in tomorrow for 2 more projects we will be making at our April Stamp Camp

Reflections

This card demonstrates the mirror image technique we will be doing at our Mostly Male Stamp Camp on March 4th and 5th. 

Trees 2Lovely as a tree is the stamp set we chose for this manly card.  The color scheme is Pear Pizazz and Navy.  We stamped the trees in Classic Black on Very Vanilla cs.  Then we stamped the same image on a Stamp-a-ma-jig sheet, immediately turned it upside down and used either a popsicle stick or the BasicGrey rub-on-tool to transfer the mirror image under the original image.  The image transfers lighter than the direct stamp to paper image.  We then used stipple brushes to add a bit of color – Marina Mist for the sky and Bashful Blue for the reflection.  You can use as much or as little color as you desire.  I’ve added just a tinge of Kiwi ribbon for color.

Trees D betterThis is the same card stamped with Craft Black.  The tree image is darker than the one above stamped in Classic ink, but the ink takes time to dry, and if you stipple before the ink is thoroughly dried, you will pick up some black as you stipple.  If  you choose to use the Classic ink, our suggestion is to do the stamping as soon as you arrive at stamp camp so that the ink has time to dry before you stipple on the color.  The sparkle that is reflected on both cards is Dazzling Diamonds applied with the help of the Zip 2-Way Glue pen.  This card could be used for a manly birthday and also as a thinking of you, or sympathy greeting.

We hope to see you on Friday, March 4th from 3 – 9 PM or Saturday, March 5th from 9 AM – 4 PM.  533 Emerson Circle, Bolingbrook 60440.  Friday evening we will be snacking on Bear Creek Chili (no Weight Watcher points) and an artisanal bread.  Give Rosemary a call if you have any questions – 630-759-3089 or drop a line at www.paperrose01@aol.com