PAINTED POPPIES

In my previous blog post, I mentioned that the Hibiscus was one of my favorite flowers.  Well, the Poppy is another favorite of mine!  This card was case’d from Stampitupwithjamie.com.

Painted Poppies flat and butterflySometimes you see a card that is perfect and there is no reason to make any changes.  This was almost one of those cards.  I did change the top layer from Whisper White to Very Vanilla and added the linen look with the Subtle Textured Expressions Embossing Folder (TIEF). I also changed the sentiment and how it was displayed.  I am in love with these 2 dies from Sending Flowers and incorporating them for a sentiment. 

Painted Poppies glimmer and butterfly

The color combination of Grapefruit Grove, Calypso Coral, Old Olive and Mossy Meadow is extremely pleasing and denotes a peaceful feeling.  The Poppy Moments Dies are perfect for die-cutting all the pieces.  The Grapefruit Grove outline is a bit tricky to adhere so that is being die cut with Sizzix backed adhesive.  The second card sample has a bit of Wink of Stella bling and a 2-part center with a rhinestone.  By the way, did you see the butterflies?
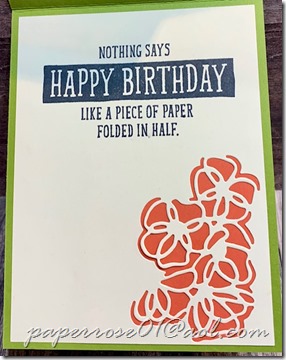
Painted Poppies message Calypso backgroundOne of the dies that comes with the Poppy Moments Dies is a poppy pattern with the vacant portions forming the poppies.  For the message layer, a piece of Calypso Coral cs is adhered to the back of the Very Vanilla to allow the color to carry thru from the front to the back. Note the humorous message used.  This comes from the Birthday Wit set.  The Stamparatus  is used as a double stamping is needed due to the heavy black area.

Painted Poppies message green backgroundThe message layer for the second sample has the olive background peeking thru the poppy images.  Although not as colorful as the message layer above, it is still very pleasing.

This is the final card for March Stamp Camp.  We have seen daisies, tulips, hyacinths, poppies, and ladybugs – lots of spring cheer.  Please let me know what day you plan on coming and which cards you wish to do.  The dates are March 5, 6, and 7.  Everything you need to make your cards is provided including beverage and a snack.  The cost remains $14 for any 4 cards and $3 for each additional card. 

In April we will have Stamp Camp on April 2, 3 and 4.  We will be making both birthday and Easter cards. Mark your calendars now!

Blessings, Rosemary – (H)630.759.3089 – (C)630.965.1965 – paperrose01@aol.com

TIMELESS TROPICAL

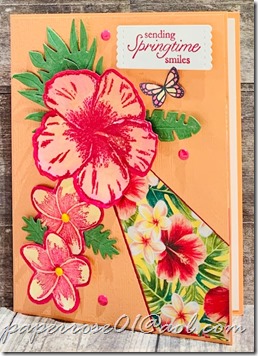
Is it too early to think about hibiscus on warm spring days?  Hibiscus are one of my favorite and we always have 2 plants festooning our deck from spring until frost.  In 2019, one of our Hibiscus was a tri-color and featured pink, yellow and orange blossoms!

Timeless Tropical pinkishThe Tropical Oasis Designer Series Paper (DSP) is lovely and incorporated into the card in a pie-shaped wedge.  The Grapefruit Grove card base is layered with Grapefruit Grove that has a pie-shaped piece removed.  The top layer is textured with the the Subtle Textured Impressions Embossing Folder (TIEF) to give the linen finish.  The two samples are slightly different in color.  The sample to the left is stamped in Lovely Lipstick and colored in Lipstick, Flamingo, Rococo Rose and So Saffron Stampin’ Blends.

Timeless Tropical LadybugThe sample to the right is stamped in Real Red and colored with Light Coral Calypso and touches of Light Real Red.  On both cards, more So Saffron was used on the plumeria and Garden Green was used to die cut the foliage.  I used the foliage for a pineapple with the Hibiscus as I felt it looked tropical.  The second sample features only only one plumeria but has a little ladybug partially tucked under a Hibiscus leaf.  Is this the one you will choose? 

As a reminder, March Stamp Camp Dates and Times:  Thursday March 5th from 11am-6pm, Friday March 6th from 12Noon-6pm and Saturday March 7th from 9am-4pm. 

Don’t forget about the Sale-A-Bration promotion which ends March 31st.  The second release of free items will be available on March 3, 2020.  There will be Flowering Foils Specialty Designer Series Paper, a stamp set titled Rise and Shine, a masculine stamp set titled Well Dressed, Vellum Specialty Designer Series Paper, and a stamp set titled Tags in Bloom.  As with all Sale-A-Bration items, when they are gone, they are gone.  Check out current items here  Sale-A-Bration.  On March 3, the second release items will show on that site.

Looking forward to seeing you at March Stamp!  It appears we will not have snow on those days so we can spring away with our card creations!

Blessings, Rosemary (H)630.759.3089 – (C)630.965.1965 – paperrose01@aol.com

SENDING SPRING FLOWERS

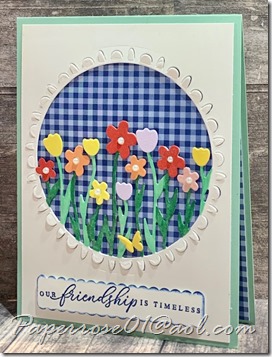
Sending Spring 1I think this is is a lovely spring card – daisies, tulips and gingham!  The sending Flowers Die set is part of the Sale-A-Brations promotion available for $27.  Check it out here Sale-A-Brations Coordination.  The die is one piece – the leaves, flowers, circle and leaflets all from this wonderful die. The flower stems and leaves are colored with Stampin’ Blends.  The sample shown here uses light and dark Call Me Clover Blends.  Quite truthfully, it is much easier and faster to use one color for the stems/leaves.  Sending Spring Dies

There are 2 separate dies for the flower heads which allows for colorful flower faces to be adhered to the blossom.  There are 3 daisy sizes and I think 2 tulip sizes.  When I measure the 2 larger tulips they appear to be the same size but sometimes I think my eyes are playing tricks on me and 1 might be smaller than the other!

Sending Spring 2The first sample of Sending Spring Flowers is done with a rainbow of colors.  The second sample red daisies and purple tulips.  Both samples have pearls centered in the daisies.  The sentiments for both cards use the dies included with the set.  The card stock choices for Sending Spring Flowers are Night of Navy as seen here as Mint Macaron as seen above.  There is an assortment of gingham designer series paper to choose from. 

Sending Spring Flowers paper assortment

An assortment of blue, red, pink orange, lavender, and yellow is available for the Sending Spring Flowers cards.

This is a fun card and I think you will enjoy it!  I hope you can make it to March Stamp Camp –

BUBBLE BLOWING BACKGROUND

Hi Crafters, I wanted to briefly review the Bubble Blowing Background technique we will be doing for our Little Ladybug card.  We will be working with watercolor paper that has been trimmed to 5 1/4 X 4. 

Bubble Blowing Background 1I used 4 shades of reinkers.  Seaside Spray, Pacific Point, Blueberry Bushel, and Night of Navy.  In retrospect, Seaside Spray was too light and we will replace it with Balmy Blue for March Stamp Camp.  Small containers were partly filled with bubble solution and multiple drops of reinker were added and stirred into the solution.  A straw was placed by each solution.  Thanks to Judy C for providing our straws!

Bubble Blowing Background 2I blew into the solution so that bubbles accumulated above the surface.  I placed my watercolor paper onto the colored bubbles.  This process was replayed several times moving the paper around to pick up the color.  Then if I wanted to add a second color, I could do so by repeating the process.  Again, I could add a third color and even a fourth.  On the Little Ladybug cards, one card had a Night of Navy bubble blown background, and the other had a 4-color blue bubble blown background.  Can you see which was which?

Bubble Blowing Background 6These are the 6 background I “bubbled.”  The front one and back left were blown with all 4 inks.  The remaining 4 were blown with 1 ink each.  Back row middle was Blueberry Bushel, back row right was Night of Navy.  The middle row left was Pacific Point and the Middle row right was Seaside Spray. 

Chances are your hands will end up with a shade or 2 of blue on them, but this will only be temporary.  You may want to bring an apron although I had no issue getting the reinker solution on my clothes.  We will also be using containers that are larger than the ones I used for my bubble blowing. 

This is a fun technique and I know you will enjoy it at March Stamp Camp.

Blessings, Rosemary – (h)630.759.3089 – (c)630.965.1965 – paperrose01@aol.com

LITTLE LADYBUG

It’s almost spring!  March 19 is the date!  So let’s celebrate spring with ladybugs!

Ladybug, backgroundThe Little Ladybug stamp set is available thru the Sale-A-Brations promotion with a $300 product order.  The dies for the set are an add-on item which can be seen at Sale-A-Bration Coordination Products.  This is such a cute Poppy Parade card and although you can’t tell, the bottom ladybug is attached with a Wobble so she actually moves.  I buy my Wobbles from where else – Amazon!  They  add a whimsical touch. All the images are colored with Stampin’ Blends and touched with Wink of Stella.

Ladybug, background and envelope

The second sample features the top ladybug flying with a Wobble and shows a darling ladybug image on the envelope.  The sentiments are ancient but are popular every year at this time.  Did you notice the background?  We will blow bubbles to create this effect.  Check out the next post.

Ladybug message layer 2

The ladybug was featured again on the message layer.  Although adhered with a dimensional, a Wobble could have been used.  A sad note about this message layer.  The flower die has disappeared.  Norb searched on his hands and knees.  I searched in trash cans and counters but it is not to be found.  Another flower die now serves as a replacement.

Ladybug message layer 1And here we see the flower replacement for the lost die.  The stem and grass did not disappear!  Note the little flecks of red on the message layers. There also flecks of navy on the bubble background.  These flecks come from rapidly and firmly flicking a marker against the lid.  I’ll show you at March Camp.

So are you wondering when March Stamp Camp might be?  Dates and Times:  Thursday March 5th from 11am-6pm, Friday March 6th from 12Noon-6pm and Saturday March 7th from 9am-4pm.  The price remains $14 for any 4 cards and $3 for each additional card.  All supplies and tools are provided.  Drinks are in the fridge and my hubby usually has a snack of some type waiting for you.  You are welcome to bring your lunch, a snack, or a snack to share.  We are a very informal group. 

Don’t forget to let me know what day you plan on coming and which cards you would like to make.  This insures the correct amount of paper is cut.

Check out the March Paper Pumpkin.  Stampin’Up is advertising March as

March 2020 Paper Pumpkin: Fresh Spring Crafting and a FREE Stamp Set!

Looking forward to seeing you next week!  Rosemary –          (h)630.759.3089 – (c)630.965.1965 – paperrose01@aol.com

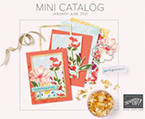
Mini Catalog

Hi Crafters!  I want to make sure everyone has access to the January-June 2020 Mini Catalog so I’m including the link here.  Make sure you check these stamps, embellishments and dies out because when they’re gone, they’re gone!!! 

FAVORS FROM THE HEART

01.31.20 Heart Tin FlamingoSometimes you want to give a special someone a special something.  Stampin’Up has Heart Foil Tins available in the new Mini Catalog.  I thought they were too cute to pass up.  The tins are 3 1/2 X 3 15/16 across and 1 3/16” high.  The tops are easy to remove but slip back on securely.  Better yet, these are even food safe!

01.31.20 Heart Tin Red

There are 18 of these tins left.  There are 19 red and 19 Flirty Flamingo heart doilies left.  The new heart punches from the Heart Punch Pack are used to punch out the red glimmer paper and From My Heart DSP hearts.  The arrow is die cut on black cs, cut in half and adhered with the two ends running “thru” the heart.  Aren’t these too cute?

01.31.20 Heart Tin Duo FrontThe heart tins are an add-on if you would like to make one.  I will have the materials pre-cut if you let me know which color combination you prefer.  Putting them together is truly very easy.  The added cost for a tin is $2.00.  The sentiment “hugs and kisses” was stamped on the Flirty Flamingo heart.

01.31.20 Heart Tin Duo SideWhen you let me know what day you will be coming, make sure you specify if you would like a heart tin for the additional $2.   As there are only 18 available, they won’t last long.

For March Stamp Camp, we are doing a new background technique called the Bubble Blowing Background!  Please don’t wear your Sunday Go To Church outfits for March Stamp Camp!  This will be a fun experience.

As a final reminder, February Stamp Camp is Thursday, February 6 from 11am – 6pm; Friday, February 7 from 12N – 6pm; and Saturday February 8 from 9am – 4pm.  Please let me know which day you are coming and what cards you want to do.  Also let me know if you want one of the heart tins.  I’m looking forward to seeing you!

Valentine Blessings, Rosemary – (h)630.759.3089 – (c/t)630.965.1965 – paperrose01@aol.com


PARISIAN BEAUTY

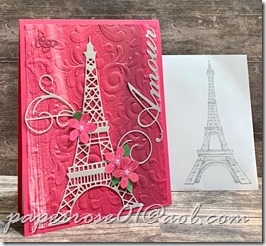
01.31.20 Parisian Beauty PinkParisian Beauty is one of the new Stampin’Up sets in the latest Occasions Catalog.  I like the simple elegance of the set.  This sample was done with the sentiment AMOUR for Valentine’s Day but it could be used for other occasions.  The DSP I used was FREE!  During the Stampin’Up Sale-A-Brations event, you can choose from an assortment of free items for every $50 in product you purchase.  This is the Lily Impressions DSP.  There are impressionist style water lily images on one side of the DSP and beautiful variegated colors on the other.  I have used the pink shades on the card above and the purple tones on the card below.  The DSP is misted with water and embossed with the new Parisian Flourish 3-D embossing folder.

01.31.20 Parisian Beauty PurpleThe images are die cut on Smoky Slate, and colored with Wink of Stella before being adhered to the card front.  Retired Petite Petal flowers are stamped and colored in Purple Posy.  Small silver metallic pearls embellish the flower centers.  Birthday wishes is the sentiment used on the purple sample.  Note the light Smoky Slate image on the envelope.  This provides a hint to the recipient as to what might be inside the envelope. 

01.31.20 Parisian Beauty Message

The card theme is even carried over to the message layer.  I found using the Stamparatus was easiest in stamping the lighter image on the envelope and message layer.  There are several additional dies and stamps that come with this bundle.  If you don’t have the January-June 2020 mini occasions catalog titled HANDMADE FOR YOU, check it out here at Spring Mini catalog.  You can check out the Sale-A-Brations event at SALE-A-BRATION

We’ve seen the 4 card projects for February Stamp Camp.  There is still one post to go – an add-on project if you are interested.  That will be the last post for February Stamp Camp.  Remember – Thursday 2/6 from 11am – 6pm, Friday 2/7 from 12N – 6pm and Saturday 2/8 from 9am – 4pm.  Let me know what day you would like to come and which cards you want to make.  Come when it is most convenient for you. 

See you in the next post, Rosemary – (h)630.759.3089 – (c/t)630.965.1965 – paperrose01@aol.com

DETAILED HEARTS VALENTINE

My sweet husband has another name for this card – Make one, Make one free!

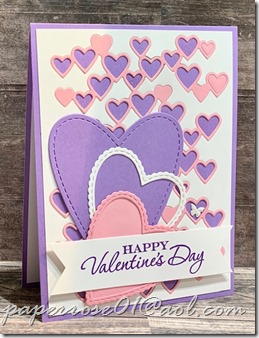
01.31.20 Detailed Heart HeatherUsing the new Detailed Hearts Die does give us 2 cards for the work of 1.  Well, maybe there is a little work on the second card, but not much.  This new die cuts out LOTS of hearts at one time.  The 5 1/4 X 4 pieces of Whisper White and Pretty in Pink (sadly retired) are mounted on Sizzix adhesive.  The die cuts the white frame for the card at the left and the pink outline shape that fits within the frame.  Be Mine Stitched dies are used to die-cut the larger hearts and the new Heart to Heart stamp set provides the sentiment.  So, as I mentioned above, the die cuts white frame but what happens to the white outline shape?  Enter the magic of Press’n Seal Food Wrap.  After running the die through the Big Shot, a sheet of Press’n Seal is pressed onto the card stock which allows it to retain its shape.  After the white frame is pressed onto the Highland Heather card front, the white outline shape is pressed onto a red card and PRESTO, see what you have!

01.31.20 Detailed Heart RedA second card magically appears!  It helps if you finish the card but most of the work is already done!

The directions may sound complicated, but it really is not hard and of course, I am here to help you.  Of course, if you are paying attention to this post, you should be asking – BUT what happens to the pink frame?  Actually, the pink frames from my cards are gathering dust on my desk.  Every card made following this process begets another card and the cycle has to stop sometime.

I hope you can come to February Stamp Camp – Thursday February 6th from 11 am – 6 pm, Friday February 7th from 12 N – 6 pm, and Saturday February 8th from 9 am – 4 pm.  Come when it is convenient for you.  Everything you need will be provided – even water and soda pop.  The cost remains $14 and $3 for each additional card.  There is a heart tin add-on available for $2 if you wish to purchase one of the 18 remaining.  There will be a an upcoming blog post on the tins.

Please let me know which day you plan on coming and which cards you want to make.  This helps so much in planning and paper cutting.

By the way, did you see the butterflies?

Blessings, Rosemary – (h)630.759.3089 – (c/t)630.965.1965 – paperrose01@aol.com

BEE MINE

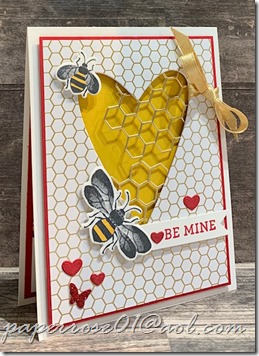
01.31.20 Be MineBee Mine comes from the new Honey Bee stamp set.  The gorgeous designer paper is FREE with the current Sale-A-Brations special.  When you purchase at least $50 in product, this Golden Honey DSP is one of the free items you can choose from. 

I thought this would be a cute card to do for Valentine’s Day although most sentiments would be appropriate.  Gold metallic foil is perfect for die-cutting the honeycomb shape.  Gold shimmer ribbon attaches the DSP to the Real Red frame and is tied in a shoestring bow.  The bees are stamped in black and colored in Crushed Curry and Wink of Stella. 

01.31.20 Bee MineThe sample above features the sentiment BE MINE stamped  in red and punched out with the triple banner punch.  The sample to the right features the BEE MINE sentiment which is die-cut with small Sizzix dies on adhesive backed cs and adhered to a punched banner.  Small hearts and the requisite butterfly are die cut and added to the card front.   The message layer is embellished with more bees – stamped and die cut.

As a reminder, February Stamp Camp is Thursday February 6th from 11 am – 6 pm, Friday February 7th from 12 N – 6 pm, and Saturday February 8th from 9 am – 4 pm.  Come when you can and stay as long as you want.  Please let me know what day you plan on stopping by and what cards you choose to make.

Blessings, Rosemary – (h)630.759.3089 – (c/t)-630.965.1965 – paperrose01@aol.com