This card was CAS’d from BJ Peters. I love this stamp from the “Easter Message” stamp set! Although I am using this set for Easter, it is very appropriate for sympathy cards. These cards are super simple.
 This elegant card uses a Very Vanilla card base with Sahara Sand as the first layer. The image is stamped in Versa Mark on a piece of Falling in Love DSP and embossed with gold embossing powder and heat set. The cross is then colored in with your choice of several markers. BJ Peters who designed this card colored in the cloth area with the White Chalk Marker. I prefer to leave the cloth plain and add a bit of Wink of Stella. The embossed DSP is layered onto gold foil cs and adhered to the card front. The inside message I chose to gold emboss on the inside layer reads “He is not here; He has risen. Matthew 28:6.” I stamped a single palm frond in Sahara Sand on the lower right corner and on the envelope.
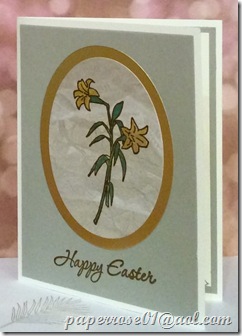
 This second sample is my design. The card stock is the same as the sample above. However, the picture photographed darker for some reason. The Easter lily stamp from the “Easter Message” set is stamped in Versa Mark on the Falling in Love DSP, and heat set in gold. The leaves and flowers are colored with Stampin’ Write markers and Wink of Stella is lightly brushed on. The lily is die cut with an oval framelit and layered on a larger gold foil oval. The sentiment “Happy Easter” is heat embossed in gold at the bottom. On the inside message layer, “May peace be your gift this Easter” is heat embossed in gold. Like the sample above, a single palm frond is stamped in Sahara Sand on the lower right corner and on the envelope. The 2 Easter Message card samples are simple but very elegant. This is definitely a case where “less is more.”
And that, fellow crafters, is what we have for March Stamp Camp! As a reminder, dates/times for March Stamp Camp are Thursday March 2nd from 2 – 9 pm, Friday March 3rd from 2 – 9 pm, and Saturday March 4th from 9 am – 4 pm. I do ask you to let me know if you are going to come during the 6-9 pm time frame so that I can fix my mother’s dinner prior to your arrival. As long as you let me know by Tuesday, February 28th which cards you wish you to, I will have your custom packet ready. Please remember to let me know as soon as you can so I am not in a cutting panic on March 1st. Cost is $12 for 4 cards and $2 for each card beyond 4.
On a personal note, it appears I will have neurosurgery on Monday, March 13th at 7:15 AM at Northwestern in Chicago. The procedure is Inter-body fusion S1 -T5 or 4. I had my preoperative appointment at Northwestern on Tuesday, February 21st. Had to give lots of blood. I will have 7-9 hours of surgery then will be in ICU at least overnight. After 7-10 days of hospitalization, I will transfer to inpatient rehab for 2-4 weeks. Marian Joy in Wheaton will be my first choice as it is acute rehab. My goal is to have Stamp Camp in May either the 4th, 5th and 6th or the 11th, 12th and 13th. The theme for May is “Honoring the Women in our Lives.” I have several new sets planned for May Stamp and am hoping I will be in shape by that date. I will be trading back pain for stiffness, but I am willing to do that. Your prayers will be appreciated!
Early Spring Blessings, Rosemary – (h)30/759-3089 – (c)630/965-1965 – paperrose01@aol.com
Filed under: 2017 Posts, Easter, Easter, Stamp Camps, Stamps, Sympathy | Leave a comment »


 Paperrose Cards And Creations
 2021-2022 Annual Catalog
 January-June 2021 Mini Catalog
 Stampin' Up Clearance Rack
 Stampin' Up Shop 24×7
 Stampin' Up! PAPER PUMPKIN – Fun without the fuss
 UNITED THROUGH CREATIVITY Digital Download


