My Christmas Angel

I think these angels are just so cute and so simple to make.  Of course they can be used anytime during the year, but I think they are perfect for this festive time of year.

Front bow red I have these hanging on my kitchen cabinets and they really add to the ambience.  Note how these two angels have their “wings” to the front.     

Bow in front blue


Back bow blue

These two angels have their “wings” to the back.  The blue angels were made from the Winter Frost DSP and are lighter weight than the red angels.  I used Real Red CS for the red angels and stamped them prior to putting them together.

Red bow in back


Not sure how these will show up on the blog as when I try to adjust picture placement, the blog ends up a bit off kilter – but we will give it a try.  I’ve used different decorations at the neck of each angel.  I’m going to try a silver halo on several angels so that I can use a Frosted Finish embellishment .  I didn’t care for the gold/silver contrast on the angels with the gold halos. 

For December Stamp Camp, I will be demonstrating these simple angels and will send you home with a template so you can make your own in any color – any card stock.  You can mix and match and create your heart away!

Remember the dates for this upcoming Stamp Camp:  Saturday, November 30th starting at 9 AM (but you must let me know if you will be attending on this date), Thursday, December 5th from 2 to 9 PM, Friday, December 6th from 2 to 9 PM, and Saturday December 14th from 9 AM to 4 PM. Please note that I will be out of town on Saturday, December 7th. Please let me know if we need to arrange an alternate date/time for you. I could easily do mornings on December 5th and 6th if that would be helpful for you.  We do not have Stamp Camp in January, but will meet in February on the 6th, 7th and 8th.  I will keep you posted on Stampin’ Up sales you might be interested in.  A new mini catalog will be coming out in December.  I’ve seen the preview copy and there are some nice items shown.  You should be receiving yours in the mail; please let me know if  you don’t receive it by the end of December 2013.

I wish you and yours a very Blessed Christmas, Rosemary – 630-759-3089 or paperrose01@aol.com

Wonderful Blessing

Although this card is very similar to the Christmas Star, Deb and I felt it was so elegant in Navy with the Stylish Stripes Embossing Folder and the 1/8” Silver Ribbon.  Although we have Navy cs cut for you, if you prefer Cherry Cobbler or another color, please let us know. 

Nativity and envelopeThe “Wonderful Blessing” image was stamped in Versa Mark and embossed in Silver.  A die cut  Silver Glimmer scalloped circle surrounds this beautiful scene with a small rhinestone glistening in the center of the star.  The double silver ribbon is highlighted with a Frosted Finishes embellishment.  Note the silver foil-lined envelope which is the finishing touch to this beautiful card.  A close up of the stamped image is below.

Nativity center 1The detail in this stamp is fantastic.  There is no need for any other message on the card front.  We did try to carry the simplicity and elegance thru on the inner message as shown below


nativity openThis is the inner part of our Wonderful Blessing card.  There is a thin strip of silver glimmer cs adhered to the top of the white cs.  I also stamped a silver star image and stamped my message in Night of Navy.  The bottom edge of my cs is finished with a retired border punch which allows the navy to peek thru. 

This is the third of the three cards we will be creating for our December Stamp Camp.  I will be putting out one additional post to show the angels I will be demonstrating.  As I mentioned before, I will be demonstrating the simple steps to make these angels and will send everyone home with a template so that you can make your own.  These make cute little ornaments, stocking stuffers, and simple gifts.

Stamp Camp for December will be held on Saturday, November 30th starting at 9 AM (but you must let me know if you will be attending on this date), Thursday, December 5th from 2 to 9 PM, Friday, December 6th from 2 to 9 PM, and Saturday December 14th from 9 AM to 4 PM.  Please note that I will be out of town on Saturday, December 7th.  Please let me know if we need to arrange an alternate date/time for you.  I could do mornings on December 5th and 6th if that would be helpful for you.

Blessings, Rosemary – 630/759-3089 and paperrose01@aol.com

Christmas Scrap Starburst

We have wanted to create the starburst card for several months now, but never seem to have the space to include in our monthly stamp camps.  So, we decided to use our Christmas paper scraps for a Christmas card.  However, any paper scraps can be used to create cards throughout the year.  To make the starburst, you need 4 pieces  – 1 1/2 X 4” – of DSP or card stock – I recommend a combination.  You will also need a sharp trimmer to cut the card stock diagonally.  Here are some finished samples:

starburst bling bestThis starburst card features DSP from the past as well as a bit of Real Red cs.  The red cs was embossed with the fancy fan embossing folder to add a bit of texture. We used narrow red grosgrain ribbon to “ground” the starburst design and finished it off with a bit of bling and a greeting.


Starburst tree 1

Christmas DSP from the past is featured here as well as Gumball Green cs that was embossed with the retired snowflake embossing folder.  A thin strip of DSP “grounds” the design and a DSP tree adds bling and interest.  Notice the offset greeting and the use of candy dots.


Starburst gingerbreadThe card features washi tape in the starburst design, at the bottom of the card, and on the inner message.  I added 2 strips of the red/white stripe washi tape to some card stock, cut out a 1 1/2 C 4” strip and cut it again diagonally.  I also used a bit of  red glimmer paper for pizzazz.   The gingerbread man was stamped, die cut and decorated with Stickles.


starburst ginger openThis is the inner message for the washi tape card above.  Note the washi tape at the bottom of the deco label.  Repeating the process I used previously, I added a strip of washi tape to my white cs and insured that the thinlit die had exact placement before I ran it thru the Big Shot.  Using the magnetic platform makes the task much easier.  The result is washi tape that is evenly distributed on both sides of the die-cut deco label card stock. 

These cards are really fun to do, and you can be as creative as you want!  For the December Stamp Camp, we will have 3 sets of pre-cut DSP/cs you can choose from, or you can choose your own from the available DSP and cs.  I will assist with cutting the cs if you wish.  Emboss using any folders from my ever-growing embossing folder collection if you choose.  Just have fun!

As a reminder, I will be out of town on Saturday, December 7th so the Saturday Stamp Camp will be held on “Black Saturday” – November 30th – and on Saturday, December 14th.  The Thursday and Friday dates December 5th and 6th starting at 2 PM.  If these times do not work for you, please contact me and we will work out an alternate date/time.  Please note that if you are coming on November 30th, please please please, let me know, as the number of people attending will affect how we set up seating. 

Blessings, Rosemary – 630-759-3089 / paperrose01@aol.com

Silver Stars

Star with envelope best

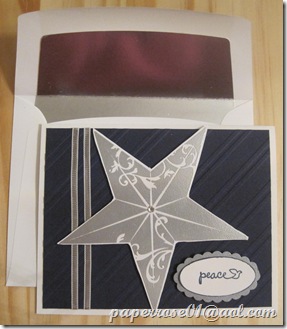
Isn’t this an absolutely beautiful Christmas card?  So striking, yet so simple.  The Christmas Star was embossed in silver, trimmed, and adhered to a navy card with a navy layer embossed with the new diagonal embossing folder.  The double1/8” silver ribbon, the simple message layered on a silver scalloped oval, and a single rhinestone finish the card.  A silver-lined envelope provides the final touch. 

This is one of the three cards we will be creating at our December Stamp Camp.  Plus, I will be demonstrating how to make a simple yet precious paper angel AND you can take home a template so that you can make these angels at home.  This is not a Stamp Camp you will want to miss!  The cost will be $10.  Please note that I will not be in town on Saturday, December 7th.  So, the dates for this stamp camp are as follows:

Saturday – November 30th – 9 AM – PLEASE let me know if you will be coming on this date

Thursday – December 5th – 2 to 9 PM

Friday – December 6th – 2 to 9 PM

Saturday – December 14th – 9 AM to 4 PM

Let me know if you have any questions!  Blessings, Rosemary – 630/759-3089 or paperrose01@aol.com

CALM CHRISTMAS

Calm Christmas

Let’s all have the calm Christmas typified by this gentle card.  The set, “Calm Christmas” is quite reasonable – $14.95 for the dove, “Peace on EARTH” and a message image used inside the card.  We did this in Pool Party and Island Indigo with a touch of the absolutely wonderful 1/8” Silver Ribbon ($4.95 for 10 yds.) a Frosted Finishes Embellishment, and foil Designer Series Paper from the .Winter Frost Specialty series.  Deb and I each did one of the cards.  The dove image on the left was inked carefully in Coastal Cabana and the sprig of greenery was colored with a Pistachio Pudding marker before stamping.  Because I have to be difficult, I wet embossed the dove image to the right.  I inked part of the dove – especially the greenery sprig – with Versa Mark, and added a light green embossing powder and added the heat.  On a separate piece of paper, I inked the entire image with VersaMark, and embossed it in Pool Party.  I cut out the dove, cutting off the greenery, and adhered it over the green image.  This was a bit labor intensive, but is an option if you choose.  Or, you can simply stamp the image in Pool Party, and trace carefully over the green sprig with the green marker.  So – lots of options – Coastal Cabana, Pool Party, to emboss or not to emboss!  We added a small rhinestone for the eye and used the oval framelits to cut our frame for “Peace on EARTH.”

This is our fifth and final project for our November Stamp Camp.  4 cards and 1 box for $12.00.  Dates/times are Thursday, November 14 from 2 to 9 PM, Friday, November 15 from 2 to 9 PM, Saturday, November 16 from 9 AM to 4 PM. 

Our schedule for December is going to be a bit different as I will be out of town on Saturday December 7th. We will have normal stamp camp on Thursday and Friday, December 5th and 6th. However, Saturday Stampers have an option of November 30 or December 14th. I could also do mornings on December 5th and 6th if that would be helpful.  We will be doing only 3 cards and already have them ready to go. They are not difficult but are quite showy.  We do not meet in the month of January, but will start back again in February.

Holiday Folder Greetings

So sad!  The 3 men (hubby, Andy, Larry) were asked to come up with a clever title for this blog – and this was the best they could come up with! 

But – let’s talk holiday folders – file folders to be exact!

Vertical folder 1This is the first file folder card we experimented with. – shown here in vertical format.  The card is created by taking card stock covered with  Designer Series Paper, and ”run” thru the Envelope Punch Board to form the tabs.  The hostess set “Warmth and Wonder” was used for the tree and ornaments.  The Season of Style DSP Stack in Cherry Cobbler, Gumball Green, and Gold provided our color scheme.  The card stock used to decorate the card was all sprayed with home brew to provide the sparkle that is so appropriate this time of year.  Although not necessary, I fully lined the inside of my folder, although It is not necessary.  By the way, if you have an Envelope Punch Board, please bring it to November Stamp Camp.

Striped file insideThe message was stamped in Cherry Cobbler on die-cut oval card stock.  Caution needs to be taken when positioning the inside message so the card stock does not appear above the file folder front.  Let’s look briefly at two other file folder cards.

File folder gold bestThis vertical file folder card uses different DSP from the Season of Style DSP Stack.  The tree was stamped with gold ornaments unlike the previous tree which was stamped with Cherry Cobbler. The process is the same as the previous card.   The ribbon was used with a slider which was much easier than tying the knot used on the previous card.


File folder horizontal goodThis is the same idea, but the card is shown in a horizontal format.  A different ribbon running around the file was used.  Home brew was used to provide sparkle to the paper. 


File folder horizontal openThis is the inside of the horizontal card shown above. 


Let’s move on to the holiday/all occasion box.  I love these boxes – 6 for $4.95 – and comes with a decorative white circle around the clear window.  I used the Gift Bow Bigz L Die to make all the bows except the red bow which came from the Pretty Presents Designer Bows.  These bows will be available for your use as will DSP for you to make your own bows.  Here are some samples:

Red box

Blue Box best

Birthday box


Multiple bows bestHere are some bows I made and the accompanying “merry” image made from the new Expressions Thinlits Dies.  Although these may look difficult, I found that placing several layers of waxed paper between the die and the card stock, and adding a shim on top of the “sandwich” before running through the Big Shot.  I found toothpicks worked fine if assistance was needed to pop the word out.  “Merry, Love, Grateful” in script come in the set.  Note the 3rd box which has been done for a birthday and has “love” embellished on the box.

There is one more holiday card to view.  I noted in my E-mail that I would post all the Christmas projects in this blog, but I am just too tired!  Check back tomorrow for the last blog for this stamp camp. 

Blessings, Rosemary – 630-759-3089

Special Season Dryer Sheet Card

We’ve been talking about making a dryer sheet card for the past month and finally, the time has come.  My sister sent me this idea and although you can make cards using this technique any time during the year, a Christmas tree works beautifully!  However, I will warn you that you might end up “wearing” glitter.  Dryer Sht Tree plain

Can you see the sparkle from the glitter on top of the dryer sheet?  It is very hard to discern in the photo.  This card is really quite simple.  We used the Special Season tree image found on page 29 of the holiday catalogue.  We stamped the bottom tree in Garden Green; then without re-inking the stamp, we stamped another tree to the right of the original image.  Finally, we re-inked the tree again, stamped off, and stamped the 3rd tree to the left of the original image.  Then we took a used dryer sheet, ironed to remove the wrinkles, and sprayed it with a spray fixative (I use Elmer’s Craft Spray Adhesive).  The sticky dryer sheet was laid sticky side down over the stamped card stock and smoothed out.  Excess dryer sheet was trimmed off and Dazzling Diamonds was sprinkled over and pressed into the dryer sheet.  After the excess glitter had been shaken off the card, we added a bit of silver ribbon on 2 of the corners, and adhered this top layer to a Garden Green card. The finished card sparkles like fresh fallen snow.

This second card has one minor difference – the ornaments on the bottom tree were colored with Smooch before adding the dryer sheet..  I like Smooch as it is shinier than a marker.  The ornaments are not noticeable in the first card but you can faintly see them in this second card.  The decision to color the ornaments or not is up to  you.  I like the cards both ways,

Dryer Sht Tree decorated

This wraps up the 5 cards we will be making in our October Stamp Camp.  5 cards – $12,00,  The dates again are:  Thursday, October 3rd from 2 – 9 PM, Friday, Oct 4th from 2 – 9 PM and Saturday, Oct 5th from 9 AM – 4 PM. If it is more convenient for you to come earlier on any of those days, just let me know and I will be able to accommodate you.

If you think you will be able to attend, it would be helpful if you could let me know which day you will be attending.  If you won’t know until closer to or the day of Stamp Camp, there is no problem as we always have extra packets ready.

Mark your calendars now for November Stamp Camp which will be held on November 7th,  8th and 9th.  We will be featuring Thanksgiving/Fall and Christmas.

Blessings, Rosemary – 630/759-3089 – paperrose01@aol.com

Halloween Happiness

I just discovered I had a typo on the E-mail address I have been using.  Guess my fingers were ahead of my brain!  My E-mail address is paperrose01@aol.com

The Halloween Happiness stamp found on page 39 of the holiday catalogue is one of my favorites.  The price for this wood-backed stamp is only $9.95 which I think is a bargain.

Halloween Happiness noseDebbie designed Halloween Happiness as a gate card with chevrons on both sides of the gate.  We cut the stamp apart so that the pumpkins were on one stamp and the message on another.  This allowed us to color the pumpkins with markers, and stamp the message separately.  I stamped the sample above.  When I stamped the Halloween Happiness, I ended up with a shadow line.  Always a believer of “make lemonade when you have a lemon,”  I took my Pistachio Pudding marker and added more squiggly lines.  I used an orange permanent marker to color a rhinestone, and added it as the nose for the second pumpkin.  The oval framelits made cutting our ovals a cinch!  To carry the oval theme thru, I used the #2 oval framelit in Pistachio Pudding layered on Pumpkin Pie for the inner card.  We will be using the Witches’ Brew Designer Series Paper (DSP) to line our envelopes for this card.   

This is the fourth card of the five we will be making at the October Stamp Camp on Thursday, October 3rd from 2 – 9 PM, Friday, Oct 4th from 2 – 9 PM and Saturday, Oct 5th from 9 AM – 4 PM. If you need to come earlier on any of those days, just let me know and I will be able to accommodate you. The cost for this stamp camp is $12.00.

Give me a call or send an E-mail if you have any questions.  I’m looking forward to seeing all of you!  Blessings, Rosemary – 630/759-3089 – paperrose01@aol.com.

The Bat Card

Hey PumpkinDaughter Debbi designed this cute “Bat Card,:  The Chevron Embossing Folder adds texture and interest to the background.  A bit of Witches Brew Designer Series Paper (DSP) sets the tone for Halloween.  A die from the Apothecary Accents Framelits sets off the punched bat (retired).  Although you cannot see it in the picture, there are actually 2 bats with the top bat secured with a Stampin’ Dimensional.  It appears the bat is preparing to fly off.  I love the “Hey Pumpkin!” stamp.  This image is part of the “Perfectly You” Hostess set found on page 39 of the holiday catalog – only $9.00 for the clear set.  Debbi finished the card by adding embellishments of black rhinestones and a bit of narrow black and white checked ribbon.  This is a perfect Halloween card for a child or an adult.  Plus it is simple to make – only 1 stamping required! 

This is the third of five cards we will be making at our October Stamp Camp.  As a reminder, we now offer our monthly stamp camps on Thursday, as well as Friday and Saturday.  As noted in my previous blog, October Stamp Camp will be held on Thursday, October 3rd from 2 – 9 PM, Friday, Oct 4th from 2 – 9 PM and Saturday, Oct 5th from 9 AM – 4 PM. If it is more convenient for you to come earlier on any of those days, just let me know and I will be able to accommodate you. $12.00 is the cost for this stamp camp and the 5 cards. 

I am loving the new Big Shot Magnetic Platform which is perfect for all my Framelits and Edgelits.  The magnetic platform holds those metal dies firmly in place over your stamped images.  It is available for $39.95 and can be found on page 185 of the big catalogue.  I have found that the time it saves is definitely worth the investment.

Give me a call or send an E-mail with any questions! Blessings, Rosemary – 630/759-3089 – paperrowe01@aol.com

Halloween Spinner

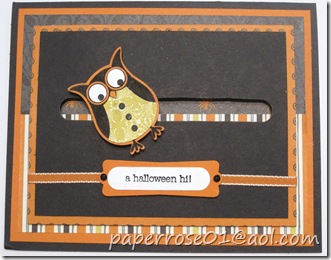
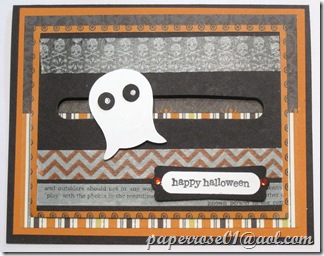
Everyone had fun with the pinwheel spinner card we made 2 months ago so Debbi and I thought it would be fun to create a Halloween spinner. You can choose your options – ghost or owl; Washi Tape or plain, ribbon or no ribbon.

Owl SpinnerHere you see an owl spinner on a Basic Black card with lots of Witches Brew Designer Series Paper (DSP),  The punched owl spins round and round and is perfect for the Halloween season.  As an afterthought, the top black cs could be embossed with an embossing folder to add more texture and interest.

Ghost spinnerThe ghost  is an ongoing symbol of Halloween.  Our ghost spinner is actually punched with the owl punch, and the feet are simply snipped off – presto – you have an instant ghost!   This ghost would be cute sponged in Pumpkin Pie or even embossed with one of the many embossing folders.  Washi Tape embellishes the top black cs.  You can use one pattern or all 3 Washi Tape patterns as shown here.

There are 3 remaining cards to post for the October Stamp Camp – a Halloween gate card, the dryer sheet Christmas card, and the bat card – not bat man, but the bat card.

October Stamp Camp will be held on Thursday, October 3rd from 2 – 9 PM, Friday, Oct 4th from 2 – 9 PM and Saturday, Oct 5th from 9 AM – 4 PM. Please note that if you need to come earlier on any of those days, just let me know and I will be able to accommodate you. With a spinner card, the dryer sheet card, the flip-flop card made with the new Circle Thinlits Die, 2 DSP lined envelopes – this is definitely a Stamp Camp you will not want to miss.  The cost $12.00 for the 5 cards.

On a personal note, I saw the surgeon at Silver Cross that will be performing my Sleeve Gastrectomy on Oct. 7th, and I had lost 7 lbs. since I had seen him in July.  I am on the pre-op diet and surviving!!!!!  Lots and lots of protein.

Give me a call or send an E-mail with any questions!  Blessings, Rosemary – 630/759-3089 – paperrowe01@aol.com