So Cute Baby Shower Card

This darling baby shower card was Baby very goodmade by our Saturday Stamper – Nina.  The So Cute stamp set ($9.95, page 79 in the 2010 Idea Book & Catalog) was used with the Nursery Suite Specialty Designer Paper.  The tiny envelopes were punched out of Very Vanilla cs with the new Petal Card Extra-Large Double Punch (page 202 in the 2010 Idea Book & Catalog).  Nina embellished the small envelopes with vanilla satin ribbon and added her message using the new decorative label punch (page 25 in the Holiday Mini).  Although Nina will miss the baby shower, I know her niece will certainly enjoy this made-from-the heart card. 

Candy Wrapper Fun

Candy WrappersI absolute adore the candy wrappers made from the Bigz L Die (Page 10 in the Holiday mini catalog).  The wrapper – or treat box – takes 5 1/2 X 6 1/2” card stock and a bit of sticky strip.  Learning how to fold and twist the end is a bit tricky but let’s face it – if I can do it, ANYONE can do it!  The really fun part is decorating these fun boxes.  We will be making these candy wrappers at our October Fall Fantasy Stamp Camp on October 1st and 2nd.  Crafters will choose their card stock color and embellish as they desire- What Fun!  Feel free to give me a call if you have any questions – 630-759-3089.

Candy Wrapper end This is the end of the box after you have folded all the score lines and twisted it flat.


Candy Wrapper bats This is my Halloween candy wrapper, except as my Granddaughter Jailyn pointed out to me,  “Gram, you put the ghost on upside down.  Now  you have a white owl.”  I sprayed the bats and the upside down ghost with my “home brew” sparkle solution and they glitter when you see them in the light. 


Candy Wrapper bird

I used the bird punch on this treat box.  The designer series paper is retired and if you look closely, you can make out the poinsettia petals on the bird


Candy Wrapper fall best

Leaves and a small pumpkin embellish this fall candy wrapper.  I love the wide grosgrain ribbon and the tiny tag punched with the Jewelry Tag Punch.  I found some retired copper cording that really coordinates with the fall colors.

Candy Wrapper owl

Here is the owl punch again.  I love this punch.  When Granddaughter Jailyn saw this treat box, she felt I should give it to her as it was her favorite.  Of course she wanted it filled with candy!  Note the little “hello” tiny tag – such a cute message.


Candy Wrapper flowers

This pretty Concord Crush candy wrapper is embellished simply with So Saffron ribbon and punched Boho Blossoms with cute brad centers.  I used a bit of Tombo liquid adhesive to adhere the flowers to the box.

Don’t these look like FUN projects????

More Holiday Cards

Christmas best This is my first Bells and Boughs card.  I started by inking the poinsettia image with Wild Wasabi and Cherry Cobbler Stampin’ Write Markers.  After I “huffed and puffed”, I stamped the image on a scalloped circle of Very Vanilla and backed that with a scalloped circle of Wild Wasabi.  I inked in the poinsettia leaves with a blender pen and Cherry Cobbler ink.  Deck the Halls Designer Series Paper (page 18) from the Holiday Mini Catalog was perfect as an accent.  The Petals-a-Plenty embossing folder added beautiful texture to the Very Vanilla background.  Finally, the new Cherry Cobbler 1/2” Seam Binding (page 21) from the mini catalog embellished the finished card. 

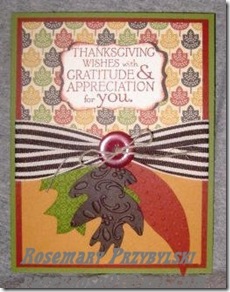
Leaves 1The wonderful Autumn Spice Designer Series Paper (page 13 in the Holiday Mini Catalog) is an absolute dream to work with.  It is textured and quite heavy.  I started with an Old Olive card, added a layer of Cajun Craze, then the Autumn Spice and a bit of More Mustard.  A few inches of 1 1/4” Early Espresso grosgrain ribbon and a button tied with linen thread creates a focal point for the card and also hides the stems of the Old Olive, Cajun Craze and Early Espresso leaves.  I used the Leaves #2 Original Sizzix die for the leaves and embossed them with assorted embossing folders.  Although I added a Thanksgiving message, this card is perfect for anyone with a fall birthday or for someone who needs a pick-me up during this upcoming fall season.

We will be making both of these cards at our Fall Fantasy Stamp Camp on October 1st and 2nd.  Give me a call if you’ve never attended one of our stamp camps and I will fill you in.  The cost is $10 and we will be making 4 cards and a cute candy wrapper box.  I will be showing the candy wrapper box here on my blog in the next several days so stay tuned!!!!!!!

FALL COLORS ARE HERE

Fall is one of my favorites times of the year because of the shades and tones we see in leaves as they change color in preparation for the oncoming cold weather.  Back in my days as a florist, I was in my glory working with flowers in shades of gold, bronze, rust, orange and dried grasses in tans and browns.  The cards Debbie and I are preparing for our October Fall Fantasy Stamp Camp remind me of those fall days of the past and the upcoming chilly days that are right around the corner. 
Fall paper 1

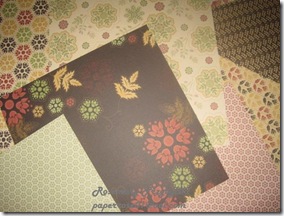
This is the beautiful Autumn Spice Specialty Designer Series Paper shown in the Holiday Mini Catalog on page 13 ($11.95).  This is the heaviest designer paper I have ever worked with and is lovely to work with.  We will be using this paper on several of our cards at the Fall Frenzy Stamp Camp.


Give thanks best

I love the French Foliage stamp set on page 14 ($14.95) of the Holiday Mini Catalog.  The More Mustard, Cajun Craze, Old Olive and Early Espresso go together perfectly on Very Vanilla to give this card a beautiful fall touch.  The “Give Thanks” message adds the Thanksgiving message for friends and family.

Fall envelope 1

Those who have stamped with me know how I stress the importance of stamping the envelope to coordinate with the card.  I love how this envelope, stamped with the French Foliage stamp set, harmonizes with the card above.


PumpkinsThis lovely fall scene is created by Debbie using Harvest Home (23.95) found on page 29 of the 2010 Idea Book & Catalog.  Deb used Pumpkin Pie, Chocolate Chip, Ruby Red, Crumb Cake and Old Olive inks and a blender pen to bring out the rich colors on her card.  This farm scene is perfect for any fall occasion from birthdays to Thanksgiving.  I love how she used the eyelet border punch allowing the chocolate chip designer paper to peek through.

Hope you can join Rosemary’s Stampers on Friday October 1st from 4 – 9 PM or Saturday October 2nd from 9 am – 4 PM.  The cost for the 5 projects we will be making is $10 – what a bargain!  We will be creating the 2 cards above, an additional fall card, a Christmas card  with Cherry Cobbler poinsettias, and a cute treat box made from the Bigz Candy Wrapper die.   You will have YOUR choice of card stock color and YOUR choice of embellishments (bats, ghosts, leaves, flowers, owls, designer paper!),  Give me a call at 630-759-3089 or E-mail me at www.paperrose01@aol.com if  you have any questions!

Also mark November 5th and 6th on your calendar for our HOLIDAY FRENZY Stamp Camp – your choice of making 6, 12, or 18 cards! 

Debbie’s Trio of Creativity

Celebrate Card

Debbie spent some time in her craft area creating cards for her friends and family.  This birthday card is simple yet stunning in Tempting Turquoise, Basic Black and Whisper White.  The eyelet border punch and the single photo corner punch add the final touches.


 Happy Anniversary

I love this stunning anniversary card.  It looks like frosting on the top of a cake and good enough to eat.  Debbie didn’t have any Bermuda Bay ribbon, so she colored white grosgrain ribbon with a stipple brush and Bermuda Bay classic ink.  The use of the Vintage Wallpaper embossing folder, tiny punched Boho Blossom flowers and pearls was absolutely perfect!  Stampin’ Up pearls are a great purchase at $4.95 for 150 pearls in 3 sizes.  Check out the pearls and rhinestones on page 188 in the 2010 Idea Book and Catalog.

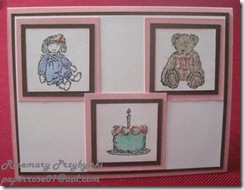
Willow BirthdayHappy Birthday to Baby Willow who turned one on September 8th!  Debbie used two retired sets – Buttons, Bows and Twinkle Toes, and Favorite Teddy Bear in Pretty in Pink and Chocolate Chip.  She colored with water color pencils and added a bit of glitter.  I hope Willow appreciates her Grandmother’s creativity.  I now have to think of MY card for the upcoming party!

The Punch-A-Bunch Stamp Camp Favorite

Page on a Card InstructionsPage on a Card was the favorite at our September Punch-A-Bunch Stamp this past weekend!  We tore pages out of a book my sister had sent me – “The Good-Bye Body.”  Some folks had a real sense of humor when they chose their pages from the book.  I won’t mention who chose the chapter entitled “Damsel in Distress” to send to a friend having family problems.  Another stamper suggested using the page entitled “Prologue” for a sympathy card.  We made the flower by wetting and crinkling 6 scallop circles punched from a page in the book.  After the circles were dry and sponged in Chocolate Chip, we gathered the circles together, punched a hole in the middle and inserted a brad.  Then we tightly crunched up the of petals, one layer at time.   Finally, we relaxed the lower petals and attached the flower to the page with glue dots.  Our last step was to spray the flower and cover with a fine mist of our “homebrew” glitter.


HOMEBREW GLITTER MIST

1 ounce Rubbing Alcohol

6-8 drops of Shimmer Paint (pg 195 – $5.95)

Small Spray Bottle

Mix alcohol and shimmer pain in bottle, shake and spray to your heart’s content.  The result is a very fine glitter that adheres to your card stock. 

Christmas in September??????

Pink Christmas_4 Merry Christmas Everyone!  Debbie and I had the pleasure of participating in a holiday swap with other Stampin’ Up demonstrators.  We sent 31 pink and white Christmas cards with these beautiful embossed ornaments.  Many thanks to Nina for helping us put them together.  We are looking forward to the cards we will receive in exchange.


Christmas Ornament_InstructionsThis is the same card done in different colors.   We did this card in our Punch-A-Bunch Stamp Camp this weekend and the red and purple ornaments were the most popular.  We used Crumb Cake, Very Vanilla, Whisper White and Glossy White card stock along with the Vintage Wallpaper, Square Lattice, and Perfect Polka Dots Embossing Folders.  Gold cording, 5/8” satin ribbon and a tiny pearl were the finishing touches.